
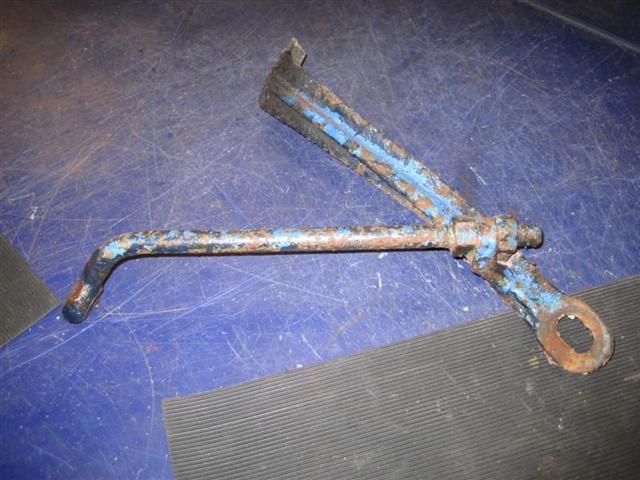
Bij het ontmantelen
van de ploeglichamen constateerde ik ook een versleten zool aan de
voor schaar. Dit was de oorzaak van een verkeerde meting in de snijbreedte
van de ploeg. Een nieuwe was snel gemaakt. Ook de draad van de verstelling
van het achterste rister was slecht. Een nieuw rond stukje met een
eindje draad er op gelast en het werkt weer perfect en is bijna niet
te zien.
Wat schroefdraad betreft moet ik wel enkele concessies doen. Standaard
is het Engelse BSW draad. Voor vervanging is deze moeilijk te vinden.
Amerikaanse draad UNC is heel eenvoudig te kopen bij alle NH dealers.
Ploegbouten zijn echter weer in metrische draad de oplossing. Liever
had ik alles BSW en de fijne BSF variant gehad.
With the dismantling of the plough body's I discovered that the landslide
of the front share was worn. This was the cause of a wrong measurement
in the plough wide earlier. Another one was quickly made. The thread
of the adjustment of the rear mould board was bad. A new round piece
with a short peace of thread is welded on and it works perfectly again
and is almost invisible.
What thread is concerned, I do have to make some concessions. Default
is the English BSW thread. Replacement is very difficult to find. American
thread UNC is very easy to buy from all NH dealers. For plow bolts the
solution is metric thread. I would have preferred all BSW and the BSF
fine version.
Ondertussen ben
ik begonnen met het opnieuw in de verf zetten van alle schoongemaakte
en gerepareerde onderdelen. De werkwijze is eerst vetvrij maken, dan
in de Owatrol olie smeren met een doek. Deze olie gaat een binding
aan met de achter gebleven roest en zorgt voor een betere hechting
van de verf. Ook blijft de verf langer vloeibaar en kruipt daardoor
in kleine gaatjes, zodat die beter opvullen. Daarna een laag grondverf
van AllGrund. Deze grondverf heeft een zeer goede hechting op allerlei
ondergronden en verbind zich ook aan roest. Omdat ik alleen witte
verf had heb ik dat eerst gebruikt, maar later ben ik overgegaan op
grijs.
Meanwhile, I
started to paint all cleaned and repaired parts. The method was first
degreasing, then oil them with Owatrol with a cloth. This oil bonds
with the remaining rust and ensures better adhesion of the paint.
Also, the paint remanes more fluid and therefore crawl into small
holes, so they will fill better. Then a layer of primer AllGrund.
This primer has excellent adhesion to various substrates and also
bonds with the rust. Because I only had white paint, I used that first,
but later I switched to gray.


De kleurlak heb
ik zelf gemengd van Ford 1000 serie blauw en grijs met een verhouding
van 2 op 1. Deze kleur lijkt op de licht blauwe kleur die ik onder
de E27N kleur aan trof op de ploeg. Ook lijkt hij veel op de New Major
kleur. Precies zal het niet zijn maar niemand weet wat de echte kleur
moet zijn omdat het geen Ransomes kleur is.
I've mixed the
colour paint myself from Ford 1000 series bleu and gray with a ratio
of 2 to 1. This color is almoost similar to the light blue color I
found underneeth the E27N color on the plough. It also looks a lot
like the New Major color. It will not be precies, but nobody knows
what the real color should be as it would be no Ransomes color.


Nadat ik alle
onderdelen van de ploeglichamen had gedemonteerd had ik nog steeds
niets gevonden wat de oorzaak kon zijn van het hoogte verschil. Alles
leek hetzelfde. Ook nadat ik de basis elementen op de vlakplaat had
gesteld kwam ik maar aan een millimeter verschil. Pas nadat ik de
scharen weer op de zuil monteerde bleek dat hiermee het verschil werd
gemaakt. Voorheen is denk ik de montage van de risters eerst en van
de scharen het laatst gedaan en daardoor kwam er verschil in de bevestiging.
Wanneer ik begin met de ploegbouten aan de bovenkant van de schaar
te plaatsen en zorg dat de zijkant van de schaar goed tegen de zijkant
van het element zet komen de beide scharen hetzelfde te zitten. Wel
moet dan het gat aan de zijkant worden om gewerkt.
After all parts
of the plough body was removed, I still could not find the cause of
the height difference. Everything seemed the same. After I placed
the basic elements on a flat plate, I measured only one millimeter
difference. Only after I assembled the shares again it showed that
this was how the difference was made. I think, previously at the last
assembly, they started with the moulboard to assemble and the shares
at last. That made the difference. When I start to place the plough
bolds at the top of the shares and make sure the right side of the
share is against the side of the frog, both shares will be in the
right place. However the hole on the side frog on one element should
have a correction.


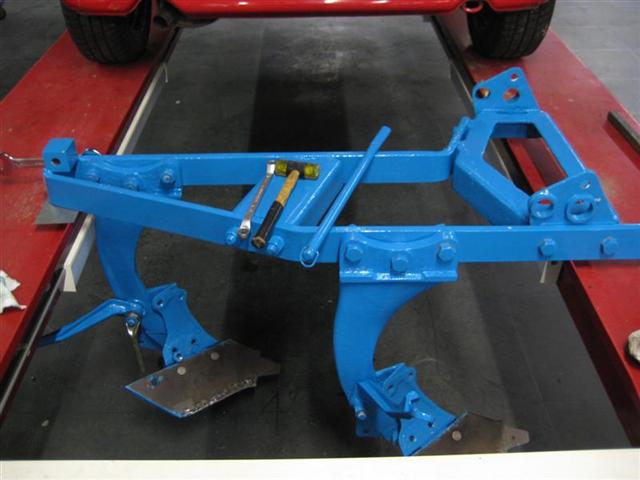
Nadat ik het frame
in elkaar heb gezet ben ik begonnen met de opbouw van de ploeg elementen.
Door het frame op de vierkoloms brug te hangen en uit vlak te stellen
kon ik zowel hoog als laag werken en ook tegelijk meten.
Eerst heb ik de ploegbomen er aan gehangen en heb met een waterpas
na gekeken of de gaten voor de zuil goed kwamen. Door de boom die
eerst achter zat naar voren te brengen kwam dit precies uit. Daarna
heb ik de zuilen gemonteerd en gekeken waar welke zuil het beste uitkwam.
Nadat de scharen waren gemonteerd kon ik het resultaat goed meten.
Na wat heen en weer monteren vond ik de juiste stand, zodat beide
schaarpunten bij een vlak gestelde ploeg precies op de grond komen
en de scharen in dezelfde hoek staan.
After I've put
together the frame, I started building the plough body's. By hanging
the frame level on the four kollom bridge, I could both work high
and low and also simultaneously measure.
First I put the plow beams in place and with a level I could checked
if the holes for the frogs were in line. The beam that was first behind
was put on the forward beam and then they leveled exactly. Then I
mounted the frogs to see what came out the best. After the shares
were assembled, I could measure the result properly. After some back
and forward reassemble, I found the right position. So now, when the
frame is level the two share points are level on the ground and the
angle of the shares are the same.


Nu konden de risters
er op geplaatst worden. Toen kwam aan het licht dat de gaten bij de
risters verschillend geplaatst waren. Een verschil van 5 mm. Bij het
ene rister moest het bovenste gat om en bij de andere het onderste.
Ook moest bij de stukjes die voor de risters zitten de gaten verschillend.
Blijkbaar had ik twee verschillende rister sets. Dit blijkt ook uit
de nummers achterop. Nu begreep ik dat alles zo goed en zo kwaad als
dat kon voorheen was vast gezet en dit voor het verschil in uitlijning
zorgde. Met een dremel en heel veel geduld heb ik de gaten omgewerkt.
Daarna het ovale gat dicht lassen en weer uitwerken tot een vierkant
gat met een ronde afschuining. Per gat duurde dit ongeveer drie uur.
Op de foto's zijn de verschillen te zien. Uit eindelijk is alles goed
ten opzichte van elkaar uit gelijnd.
Now the moldboards
could be placed. Then I notice the difference between the holes on
the moldboards. At one the above hole and the other the lower hole
there was a difference from about 5 mm. Also the small moldboard peaces
in front were different. Apparently I had two different moldboard
sets. Both numbers on them are different to. Now I understood that
they mounted everything as good and as bad as it could and this caused
the difference in alignment. With a dremel and lots of patience, I
reworked the holes. Then the oval hole was welded and then worked
into a square hole with a round bevel. One hole took about three hours.
The pictures shows the differences. In the end everything is properly
aligned relative to each other.


Op de foto hiernaast
is ook te zien dat ik de scharen heb opgelast. Door slijtage was er
een verschil van 2 cm tussen de scharen. Eerst heb ik met MigMag de
twee cm verschil er aan gelast en daarna beide scharen met elektrodes
opgelast. Over het resultaat ben ik niet tevreden. We zullen zien
of dit goed ploegt.
On the picture
on the left you can see that I have welded the plough share. This
was because the was a difference from about 2 cm between them. First
I welded with Mig Mag the 2 cm on and then with electrodes I have
welded both shares. I'm not pleased with the result. We shall see
if this gives good plough work.

|